Installing a kitchen sink coupling or a drain strainer can seem like a daunting task, but with the right tools and guidance, it can be a simple DIY activity. Here’s a step-by-step guide to help you efficiently install your kitchen sink coupling or drain strainer.
8 Steps to Install Kitchen Sink Coupling
-
Open the Sink Coupling Parts

Begin by unpacking all the components of the sink coupling. Ensure all parts are present, including the upper cup, lower part of the coupling, reducer, rubber washer, and strain cup. Familiarise yourself with each part as this will make the assembly process easier.
-
Remove Upper cup First

Start the installation process by removing the upper cup. You will reattach this part later once other components have been correctly placed.
-
Attach the Reducer
(if there is any leakage then use the PTFE tape)

If your sink coupling comes with a reducer, attach it next. If there’s any sign of leakage, use PTFE tape to ensure a watertight seal. PTFE tape acts as a sealing agent to prevent leaks in plumbing joints.
-
Place the Coupling’s Lower Part

Position the lower part of the coupling in the center of the sink hole. Make sure it is correctly aligned to ensure a secure fit and to avoid any potential leakage.
-
Set the Rubber Washer/Water Seal
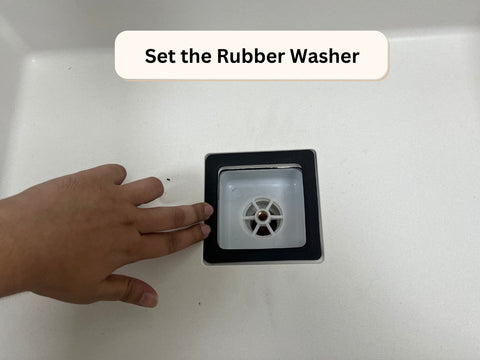
Next, place the rubber washer, ensuring that it sits snugly. The rubber washer sal acts as a seal, preventing water from leaking beneath the sink.
-
Place the Upper Cup on the Washer

Reattach the upper cup that you removed earlier. Place it on top of the rubber washer, ensuring that all parts are aligning correctly.
-
Tighten the Pin to Attach with Lower Part

Tighten the pin to secure the upper and lower parts of the coupling together. Ensure that all components are tightly secured to prevent any movement or leakage.
-
Place the Strain Cup on the Top

Finally, place the strain cup on the top of the assembly. The strain cup will catch any larger particles, preventing them from going down the drain and causing blockages.
Installing a kitchen sink coupling or drain strainer doesn’t have to be complicated. By following these steps and ensuring that each component is correctly placed and securely tightened, you can achieve a leak-free installation. Remember always to check for leaks before finalising the installation and make necessary adjustments as required. Happy installing!
Read More Installation Process:
For a more detailed guide, watch the video tutorial at the provided link:


